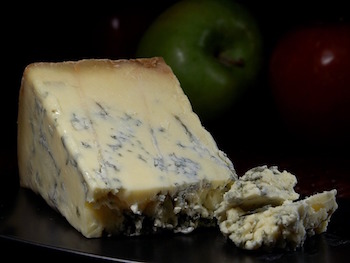
Blue cheese is the general name for cheese that has had the Penicillium cultures added to it.
This produces flecks or veins of blue mold through the cheese. ‘Branded’ blue cheeses include Stilton, Gorgonzola and Roquefort.
Blue Cheese Recipe Ingredients
- 10 litres whole cows, goat or sheep milk
- Tiny speck of Penicillium Roqueforti ( make your own here)
- 1/2 teaspoon Mesophilic starter i.e. Chr. Hansens R-704
- Rennet diluted in 1/4 cup water (see manufacturers instructions for amounts)
- 3 tablespoons of Cheese Salt
How To Make Blue Cheese At Home
- Warm milk to 30c
- Add cultures, stir thoroughly
- Leave to ripen for 1 hour 30 minutes, keeping the temperature at 30c
- Add Rennet diluted in 10mls of boiled and cooled water
Stir thoroughly - Leave to set for 1 hour or use the Flocculation Method to achieve the optimum set
- Carefully cut the curd into a fine curd
A whisk can be helpful for this but don’t cut the curds up too small with it, just to about the size of a small pea
The smaller the curds, the firmer the cheese so the size can be altered to your desired moisture preference - Stir curds every 5 minutes, over the next 60 minutes, to prevent them matting
Maintain the temperature at 30 degrees Celsius - Leave to rest for 5 minutes
- Drain the curds over a colander lined with cheese cloth as thoroughly as possible, while still keeping the curds warm
The better the curds are drained, the more open the interior of the cheese - Gently mix in 3 tablespoons of fine cheese salt
- Transfer the curds to open ended molds on draining mats and drain for 4 hours
Turn every 15 minutes for the first hour
Then turn every hour for the remaining 3 hours - Turn again and leave for 8 hours, or overnight
Cheese should be stored at 80% humidity at 20 degrees Celsius - Turn again and leave for another 8 hours
The same temperature and humidity as above should be provided - Remove the cheese from the mold, sit on a draining mat to drain for another 8 hours
The same temperature and humidity as above should be provided - Sprinkle with salt, shaking off any excess
- Stack the cheeses on top of each other and ripen the cheeses at 95% humidity at 10 degrees Celsius
- Rotate and turn the stack each day for 7 days, rubbing each round with a small amount of salt each time
- Rotate and turn the stack for another 7 days, no further salt required
- Pierce the cheese with a fine needle at regular spacing approximately 2.5cms apart
- Ripen for another 90 days at the same humidity and temperature
Turn the cheese every 3-4 days
Mold should appear within the cheese with 1 month
You will need to scrape any outer mold from the cheese during this period - Wrap the cheese in foil or cheese paper and store at 8 degree until you are ready to eat

What is Needling Cheese?
Now that you have an idea of how to make blue cheese at home, you probably may be wondering what needling is all about. Is it that important? Well, I’ll tell you this, Blue cheese wouldn’t be Blue cheese without needling, plain and simple.
So why is needling done? For starters, needling is the process of poking many tiny holes on your blue cheese to create openings through which Oxygen can enter the cheese.
Basically, creating air holes by piercing or ‘needling’ and allowing oxygen to get inside your cheese, allows the characteristic blue veins to form properly.
In a typical cut of blue cheese, the distinct blue veins are the paths where the needle pierced and went in.
The size and number of needling determine how much oxygen enters and feeds the Penicillium roqueforti cultures. Consequently, this determines the number of blue veins formed.
How to Needle Blue Cheese
- Four to ten days after mold has begun to appear on the cheese, use a stainless-steel needle to pierce through the rind. This can be done as many times as you would like.
Be careful however not to place the holes too close together as this can cause the cheese to crack later on.
A while back, copper needles were used but it is now recommended to use stainless steel needles instead.
2. Another needling method entails placing your Blue cheese loaves or wheels into a machine made for this purpose. The machine has piercing needles that have “bugle”-shaped tips.
These are pushed into the cheese in a pattern specific to the shape of the cheese. The cheese is pierced from all sides in succession minimizing cracking.
Use salt or aluminium foil to cover the cheese so as to slow down the proliferation of the mold. By varying the time you leave the cheese to develop the blue veins, you can age it longer without it becoming overwhelmingly blue.
How to get Different Blue Cheese Flavors
Differences in a Blue cheese’s texture, taste, and smell are dependent on the type of milk; whether cow, sheep, or goat.
What the animals ate before getting milked, and the unique cheesemaking techniques used by each cheesemaker.
These, plus the aging process, and even the shape ensures every Blue cheese develops its own distinct flavor.
How to Make Blue Cheese Without Cultures
When making Blue cheese at home, the standard protocol involves you ordering “pure” strains of Penicillium roqueforti from our cheesemaking supply store.
You can also use an ounce of your favorite blue cheese to create a new wheel of Blue cheese.
Simply pop it in the blender, add some water, then add it to your milk mixture.
The main advantage of using this method is that your favorite ounce of Blue cheese comes pre-populated with all the bacteria you need.
These bacteria make your cheese as nutty, super stinky, mild, firm or as pungent as you want it to be.
The pre-existing probiotic organisms rapidly take over your new wheel of cheese giving you that flavor you so much desire. That is as easy as it gets when making Blue cheese at home.
Do you have any questions or comments about how to make blue cheese? Join the discussion over at the Curd Nerd Forum. We would love to hear from you!
Related Blue Cheese Posts
How To Make Blue Cheese Cultures (Penicillium Roqueforti)
isn’t R704 a mesophilic culture? with the temperature you are giving, isn’t a mesophilic enough? thermo should be used for higher temps, is this right? we are still just past being novices at this cheesemaking.
Hi Lindsey
Thank you for spotting that! You are absolutely right.
It should have read Mesophilic instead of Thermophilic. I had the right product code but typed in the wrong culture type. Ops!
Sorry about that. I have fixed this up now : )
Pingback:Age Does Matter - Aging Home Made Cheese | Curd-Nerd
I have found that ripping the young cheese apart allows for a more open texture and better mold distribution. Technique similar to milling is fine. We have tended to shred the curds after the first couple of turns, probably only a couple of hours after hooping. Another point. Stacking will close the cheese up there by inhibiting blue mild spread.
I basically just tear the curds apart, don’t have to be the ‘walnut’ size talked about in milling a cheddar but just tear off chunks and rip it up and re hoop it. Stack post milling but experiment with your texture.
Hi Grant
Thanks for your helpful advice! It makes sense that stacking would ‘close the cheese up’ and inhibit the blue mold.
Pulling my cheese apart after hooping sounds scary but I’m keen to give it a try and see what it creates!
Thanks again for such a useful comment : )
Total newbie here … but it doesnt say to press this cheese ??? surely it needs to be pressed a little bit ?
also ive read somewhere else they used a (sterilized )screwdriver to pierce the formed cheese with the penicillian Roquof. mould , they said that useing a needle didnt allow for enough oxygen to enable mould growth,
i dont know either way … just wondering your opinion (and other readers ..?
btw , thankyou for your wonderfull website , its been very helpfull. !!
Hi
This cheese does not get pressed, similar to the Camembert and Brie makes.
In terms of the piercing, you can use a larger item if desired, as long as it is sterile. I personally use a metal kebab skewer for mine, which allows a good mould growth.
Thank you for your feedback about our site. So glad you are finding it helpful : )
after 60 days my blue cheese has no blue mold.? Please help
Hi Liz
We recently had another question about this. As I mentioned to this reader, you should definitely be seeing progress after 60 days so it sounds like your mold growth is being hampered by conditions of some sort. Are there other competing molds growing on the cheese? Are your humidity levels at the right point in your aging environment? And did the rest of the make go as expected? 10 degrees should be fine for aging, and you would need 95% humidity. Also, is there enough air flow to let the oxygen into the cavities, to encourage blue mold growth? These are a few things to consider, but let us know if we can help more.